
Is your chain link fence looking dull and rusty? You’re not alone. Many homeowners face this common eyesore. Chain link fences make up half of all fences sold in the U.S., thanks to their low cost and toughness.
This guide will show you how to paint a chain link fence and make it look brand new. Ready to give your yard a facelift? Let’s get started.
Key Takeaways
- Chain link fences make up half of all fences sold in the U.S. due to their low cost and durability.
- Proper preparation is crucial, including repairing damage, cleaning the surface, and using an oil-based primer to prevent rust.
- Oil-based paints with rust-inhibiting properties work best for chain link fences, providing long-lasting protection against moisture and corrosion.
- Applying paint with a roller diagonally or using a paint sprayer like the Wagner Spraytech FLEXiO 570 ensures even coverage and faster application.
- Regular maintenance, including yearly inspections, touch-ups, and repainting every 3-5 years, helps keep the fence looking fresh and protected.
Evaluating and Preparing Your Chainlink Fence
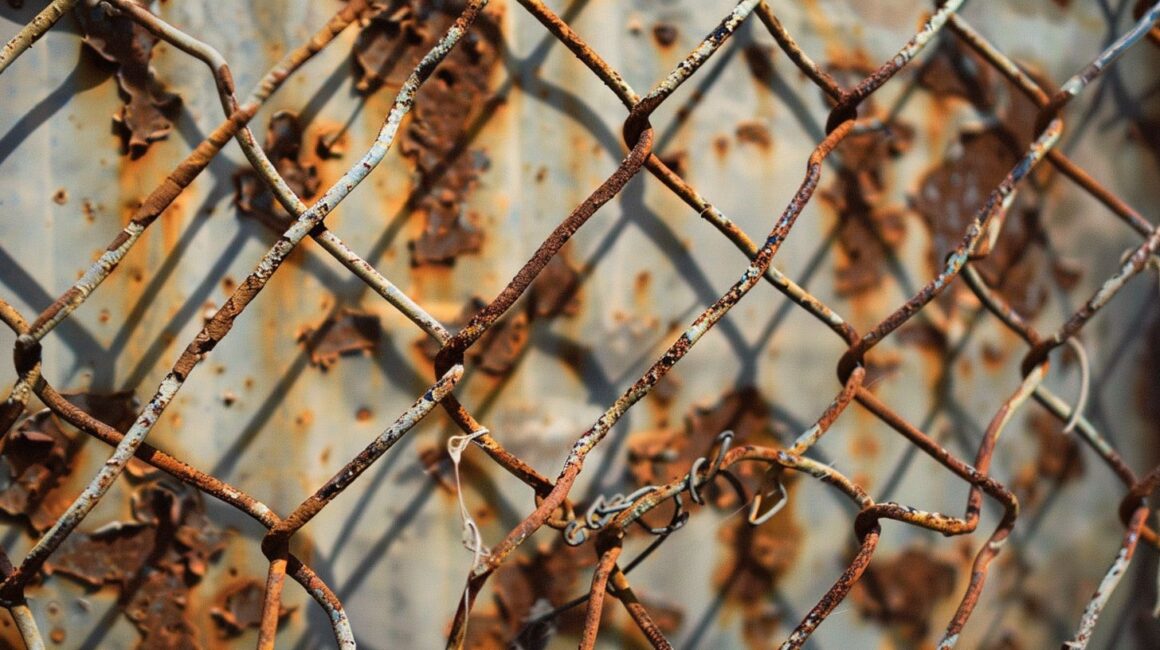
Before you grab that paintbrush, take a good look at your fence. Check for any loose parts or rusty spots that need fixing.
Evaluating the Condition of Your Chainlink Fence
Take a good look at your chainlink fence before you start painting. Check for any broken parts or rusty spots. These need fixing first. Walk along the whole fence and feel for loose wires or wobbly posts.
Make a list of what needs work.
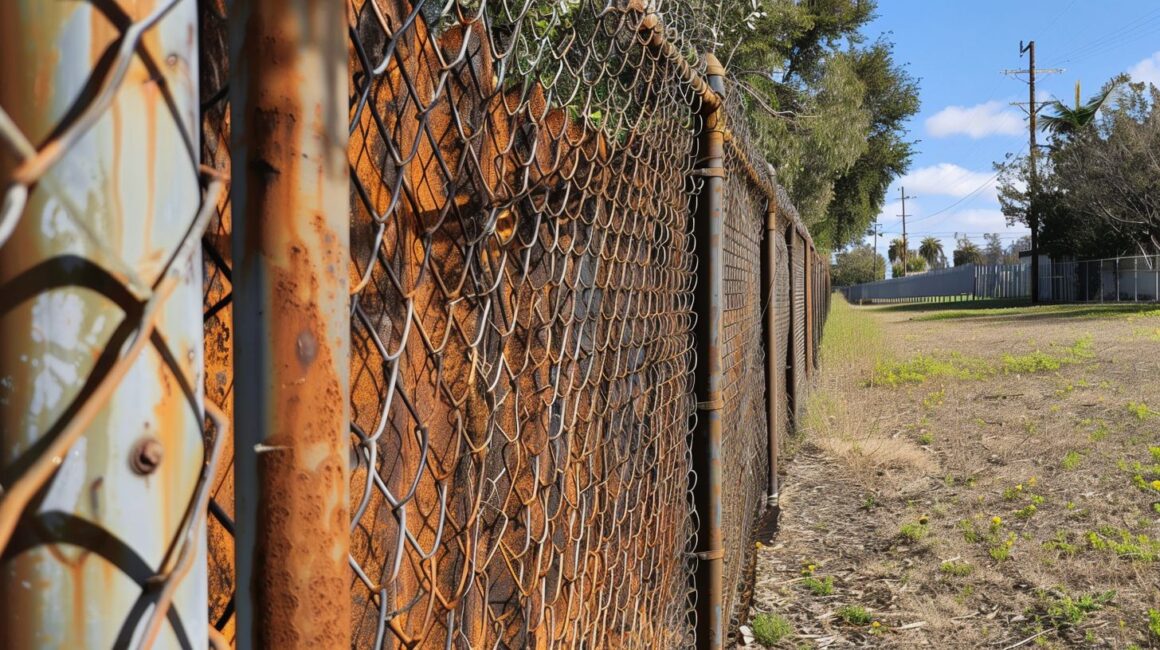
Rust is a big problem for metal fences. Look closely at the joints and ground level areas. These spots often rust first. If you see flaking paint or orange patches, that’s rust. Don’t ignore it! Fixing rust now will save you headaches later.
A little prep work goes a long way in making your fence look great.
Repairing Damages to Your Fence
After checking your fence, you might spot some damage. Don’t worry! Fixing your chainlink fence isn’t too hard. First, look for loose posts. These can make your fence wobbly. If you find any, dig them out and set them in concrete.
Next, check the rails. Bent or broken rails need to be swapped out. Last, look at the mesh. Holes or tears in the wire can let pets escape. Replace damaged sections with new mesh. It’s best to fix these issues before you paint.
This way, your fence will look great and work well for years to come.
Fixing your chain fence might seem like a big job, but it’s worth it. A strong fence keeps your yard safe and looks nice too. Plus, repairs help your paint job last longer. If you’re not sure how to fix something, ask a pro for help.
They can give you tips or do the work for you. Once your fence is fixed up, you’re ready to move on to the next step: getting it ready for paint.
Preparing a Galvanized Surface for Painting
Prepping a galvanized fence for paint takes some elbow grease. First, give it a good scrub with a pressure washer. This blasts off dirt and grime. Next, tackle any rust spots. Sand them down to bare metal.
For stubborn areas, use a wire brush. Once clean and smooth, apply an acrylic primer. This sticks well to the metal and helps the paint last longer. Let the primer dry fully before moving on.
Now you’re ready for the fun part – adding color!
Make sure to pick the right paint for your fence. Oil-based enamel works great on galvanized surfaces. It resists rust and stands up to weather. Choose a color that fits your yard’s style.
Black looks sleek and modern. Green blends with nature. Whatever you pick, plan on two coats for the best coverage. Use a roller or sprayer to apply it evenly. Don’t forget to get into all the nooks and crannies!
Protecting the Area Around the Fence
Painting a chain link fence can get messy. Let’s talk about how to keep the area around your fence clean and safe during your paint job.
- Cover the ground: Lay down cardboard or tarps along both sides of the fence. This catches drips and overspray, keeping your grass and soil paint-free.
- Shield nearby plants: Wrap valuable plants close to the fence with plastic sheeting. This stops paint from landing on leaves and stems.
- Move outdoor items: Take away any furniture, toys, or decor near the fence. You don’t want paint splatters on your favorite patio set.
- Mask nearby surfaces: Use painter’s tape and plastic sheets to cover any walls, posts, or structures touching the fence. This keeps paint off areas you don’t want painted.
- Create a buffer zone: Set up a work area at least 3 feet wide on both sides of the fence. This gives you room to move and reduces the risk of accidents.
- Protect your driveway: If your fence runs along a driveway, cover the area with a drop cloth. Paint stains on concrete are tough to remove.
- Watch the weather: Choose a calm day to paint. Wind can blow paint onto nearby surfaces, making your job harder.
- Wear old clothes: Put on clothes you don’t mind getting paint on. This way, you won’t ruin your good outfit if you get splattered.
Selecting the Appropriate Paint
Picking the right paint for your chainlink fence is key. You’ll want to grab an oil-based paint to keep rust at bay. Want to know which brands work best? Keep reading!
Choosing Oil-Based Paint for Rust Prevention
Oil-based paint is your best friend for rust prevention on chain link fences. It sticks well to metal and forms a tough barrier against moisture. I’ve used Rust Stop oil-based enamel by Ace in Black Satin with great results.
This paint goes on smooth and dries to a hard finish that lasts for years. It’s also easy to touch up if needed.
For the best outcome, pick a paint made just for metal surfaces. Look for words like “rust-inhibiting” or “corrosion-resistant” on the label. These paints have special stuff in them that stops rust from forming.
I’ve found that oil-based paints with rust protection work better than other types for chain link fences. They cost a bit more, but they save you time and trouble in the long run.
Recommended Paints for Chainlink Fences
Picking the right paint for your chainlink fence is key. Let’s look at some top choices that’ll make your fence look great and last long.
- Galvanized Steel Primer: Start with two large cans of this. It sticks well to metal and stops rust.
- Exterior Oil-Based Paint: Get two big cans. This paint fights off weather and keeps your fence looking good.
- Acrylic DTM Paint: Perfect for fences in good shape. It dries fast and holds up well outside.
- Alkyd-Based Paint: Best for rusty fences. It covers old rust and stops new rust from forming.
- Rustoleum Paint: Known for its tough finish. It comes in many colors and protects against rust.
- Spray Paint: Easy to use for quick touch-ups. Make sure to get a kind made for metal.
- Enamel Paint: Gives a smooth, hard finish. It’s great for fences that get a lot of wear and tear.
Now that we’ve covered paint options, let’s move on to the steps for painting your chainlink fence.
Detailed Steps to Paint Your Chainlink Fence
Ready to give your fence a makeover? We’ll explore the details of painting your chainlink fence. We’ll cover everything from priming to the final coat. You’ll learn how to use a roller or sprayer for smooth coverage.
We’ll also share tips on touch-ups and upkeep. Continue reading to turn your dull fence into a neighborhood showstopper!
Applying Primer with a Roller or Sprayer
Grab your roller or sprayer – it’s time to prime! For quick coverage, roll the primer on diagonally. This trick helps you coat the fence faster. If you want even coverage, go for a paint sprayer.
The Wagner Spraytech FLEXiO 570 works great for this job. I’ve used both methods, and the sprayer wins for speed and smoothness.
Make sure to use an oil-based primer. It sticks better to metal and fights rust. Apply it in thin, even coats. Don’t glob it on or you’ll end up with drips. Let each coat dry fully before adding the next.
This step might seem boring, but it’s key for a paint job that lasts. Trust me, I learned this the hard way on my first fence project!
Painting Your Chainlink Fence
Now that you’ve primed your fence, it’s time to paint. Grab your brush, roller, and spray paint. Start with the top points and bars using a brush. These spots need extra care. Next, use a fuzzy roller on the fence face.
It covers well and adds texture. For hard-to-reach areas, spray paint works best. Don’t rush! This job took me about a week, working around the weather.
Take breaks and step back often. Look for missed spots or drips. Fix them right away. I found that painting in sections helped me stay focused. Also, keep an eye on the weather forecast.
Rain can ruin your hard work. If you’re patient and careful, your fence will look great. My neighbors even asked who did the job!
Conducting Touch-Ups and Ongoing Maintenance
Touch-ups and maintenance keep your fence looking fresh. Here’s how to keep your painted chainlink fence in top shape:
- Inspect your fence yearly. Look for bare spots, rust, or chipped paint.
- Clean the fence with soap and water. Use a soft brush to remove dirt and grime.
- Sand any rusty areas. Apply a rust-inhibiting primer to these spots.
- Touch up bare spots with matching paint. Use a small brush for precise work.
- Apply a fresh coat of paint every 3-5 years. This keeps your fence protected and looking good.
- Trim plants near the fence. This stops vines from growing on and damaging the paint.
- Fix any bent or broken parts right away. This prevents further damage to the paint job.
- Use mineral spirits to clean up oil-based paint spills. Keep a rag handy for quick cleanups.
- Store leftover paint in a cool, dry place. Label it with the date and fence location for easy touch-ups.
- Take photos of your freshly painted fence. This helps you spot changes over time.
Now, let’s move on to some handy tips for painting your fence.
Effective Tips for Painting Your Fence

Want to make your fence pop? Try these cool tricks to jazz up your paint job. You can add fun designs with stencils or tackle those pesky rust spots like a pro.
Decorating with Stencils and Designs
Stencils and designs can jazz up your chain link fence. You can create cool patterns or add fun shapes. It’s easy to do and doesn’t cost much. Just pick a stencil you like and spray paint over it.
Boom! You’ve got a unique fence that stands out.
Want to get fancy? Try using different colors or layering stencils. You could even paint a mural if you’re feeling artsy. The sky’s the limit with your chain link canvas. Next up, let’s talk about dealing with those pesky rust spots on your fence.
Addressing and Covering Rust Spots
After decorating with stencils, it’s time to address the rust spots on your chain link fence. Rust can detract from the appearance and compromise the strength of your fence. Fortunately, there’s a solution.
Start by using a wire brush to remove the loose rust. Next, smooth the area with sandpaper. Thoroughly clean the spot with soap and water. Once the area is dry, apply a rust converter to prevent further oxidation.
After the converter has dried, you’re prepared to paint. Begin with a rust-resistant primer, followed by your selected fence paint. This process will improve your fence’s appearance and extend its lifespan.
Preventing Paint Overspray
Now that you’ve tackled those pesky rust spots, let’s talk about keeping paint where it belongs. Paint overspray can be a real headache, but don’t worry – I’ve got you covered. First things first, grab some tarps and plastic sheets.
These will be your best friends in this project. Spread them out to shield nearby plants, cars, or anything else you don’t want painted by accident.
Next up, painter’s tape is your secret weapon. Use it to mask off areas you want to keep paint-free. I once skipped this step and ended up with speckled grass for weeks! Trust me, a little prep time saves a lot of cleanup later.
For extra protection, try using a spray shield or a piece of cardboard when painting near edges. This simple trick has saved me from many “oops” moments while sprucing up my own fence.
Ensuring Proper Cleanup and Maintenance
Cleanup after painting your chain link fence is key. First, wash your paint sprayer well. If you used alkyd paint, grab some mineral spirits to clean it up. Don’t forget to take off any covers you put down.
A clean workspace makes future touch-ups easier.
Keep your painted fence looking fresh with regular care. Wash it now and then to remove dirt and grime. Fix any chips or scratches right away to stop rust. With a little love, your fence will stay sharp for years.
I once let my fence go, and boy, was that a pain to fix later!
Conclusion
Painting your chain link fence can transform your yard. With the right tools and steps, you’ll create a fresh look quickly. Proper preparation, selecting appropriate paint, and careful application are key.
Your newly painted fence will enhance your home’s curb appeal. Regular maintenance will keep it looking great for years to come.
FAQs
1. What’s the best way to paint a chain link fence?
The best way to paint a chain link fence is to clean it first. Use a pressure washer to remove dirt and debris. Then, apply a primer made for metal. Finally, use a roller or sprayer to add two coats of paint. This method works for both galvanized and rusty fences.
2. Can I paint over a rusty chain link fence?
Yes, you can paint over a rusty chain link fence. Start by removing loose rust with a wire brush. Then, apply a rust-inhibiting primer. Once dry, use oil-based paint for the best results. Remember, severe corrosion might need extra attention before painting.
3. How do I paint both sides of my fence without making a mess?
To paint both sides without a mess, use a piece of cardboard as a shield. Hold it behind the area you’re painting to catch overspray. For rollers, work in small sections. Paint one side, let it dry, then do the other. This trick helps keep your yard and neighbor’s property clean.
4. What kind of paint should I use on a galvanized chain link fence?
For a galvanized chain link fence, use paint specifically made for metal surfaces. Look for products labeled for use on galvanized steel. Avoid latex paints as they don’t stick well. Oil-based paints or special acrylic formulas work best. Ask at your local paint store for the right product.
5. How long does it take to paint a chain link fence?
Painting a chain link fence can take a weekend for an average-sized yard. Prep work like cleaning and priming takes about a day. Painting itself might take another full day, depending on your fence size. Don’t rush – good prep and proper drying time between coats make for a lasting paint job.
6. Can I use spray paint on my chain link fence?
Spray paint can work on a chain link fence, especially for touch-ups. For a whole fence, it’s not the most efficient method. Spray cans run out quickly and may not give even coverage. If you choose to spray, use a paint formulated for metal and work in small sections. Watch out for drips in the nooks and crannies!

Alina Lee, a 35-year-old writer and horticulture enthusiast, brings nine years of expertise to the world of gardening writing. Her journey began with a solid foundation in agriculture, having graduated from Kansas State University in Manhattan, Kansas, with a degree in Agronomy. Alina’s academic background provides her with a unique perspective and a deep understanding of the intricacies involved in cultivating and nurturing plants.
With a passion for greenery and a commitment to sharing her knowledge, Alina has emerged as a prominent figure in the gardening community. Her articles not only reflect a wealth of experience but also a genuine love for the subject matter. Currently serving as a Senior Editor at Home and Around Blog, Alina plays a pivotal role in shaping content related to gardening and outdoor living.
Alina’s writing transcends mere information; it is a blend of practical advice, scientific insights, and a touch of inspiration for both novice and seasoned gardeners. Her commitment to fostering a deeper connection between individuals and nature is evident in her work. As a Senior Editor, Alina Lee continues to influence and inspire readers, contributing to the ever-evolving landscape of gardening literature with her extensive knowledge and passion for plant life.