

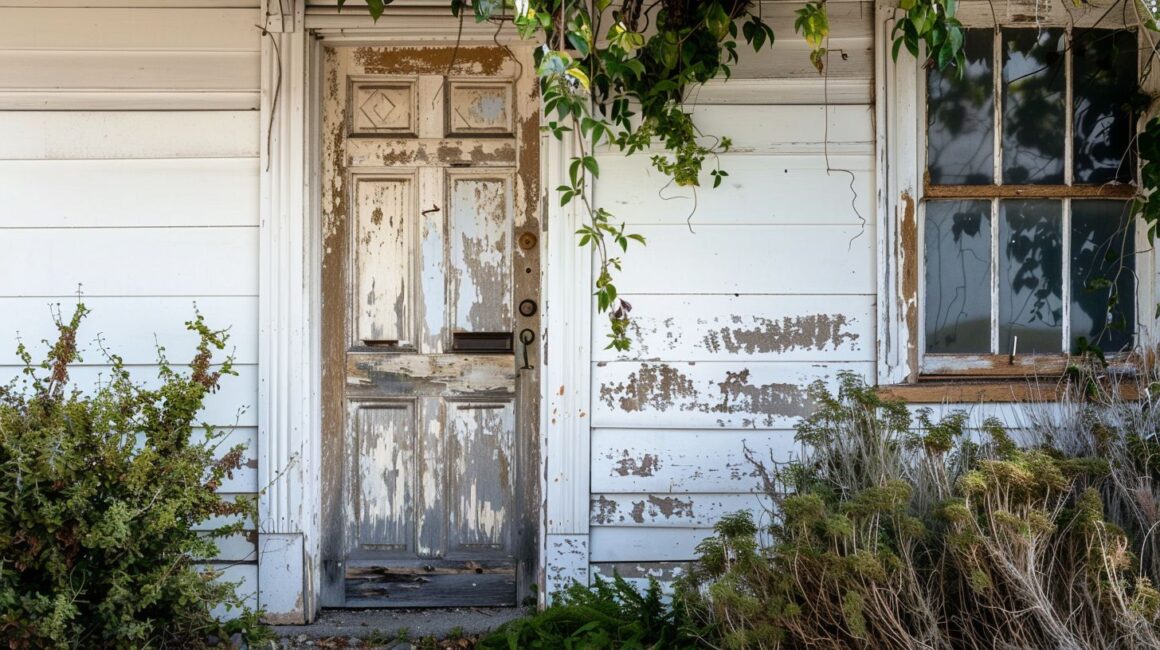
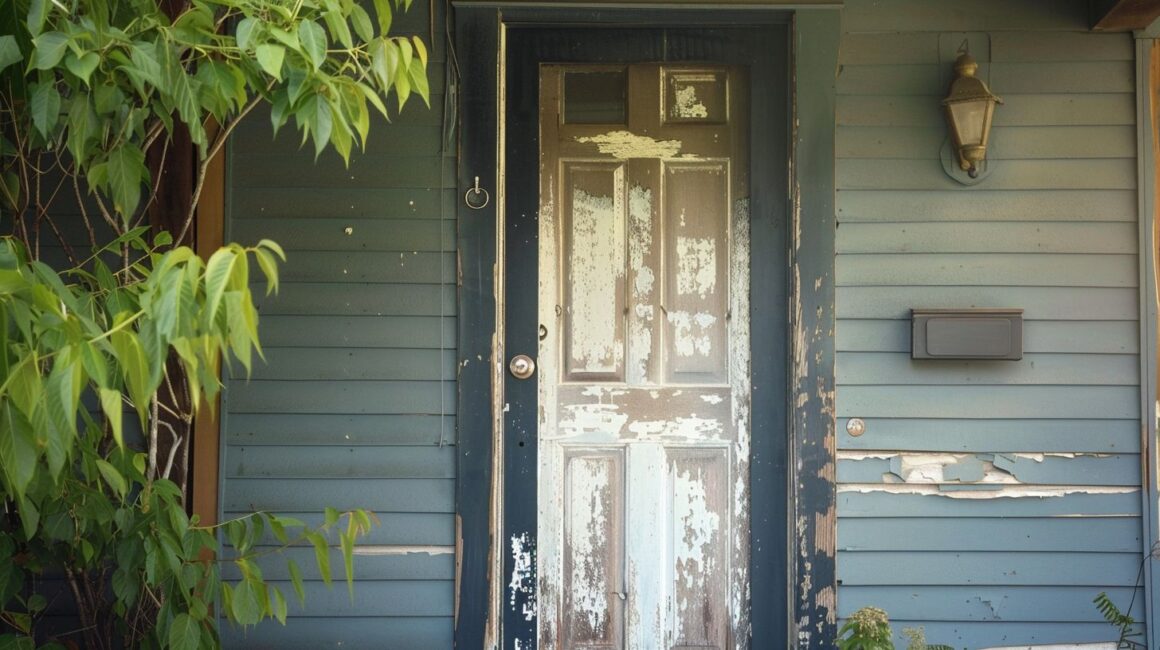
Your front door looks a little rough around the edges. Refinishing a wood door costs about $50. This article will show you how professionals refinish doors. Learn how to make your front door look amazing.
Key Takeaways
- Refinishing your front door greatly improves its look, makes it last longer, and reduces how much you need to maintain it.
- Professionals achieve a high-quality finish, but you can refinish the door yourself by following the steps of preparing the surface, applying the finish, and letting it dry properly.
- You can save time by refinishing the door without taking it off its hinges. Just remove the hardware, clean the door, sand it, and apply the finish.
- Refinishing your front door is a great way to increase your home’s curb appeal and value.
Preparation for Refinishing Your Front Door
A little prep work goes a long way. Before you grab your paint scraper and sandpaper, you’ll need to get your door ready for its transformation.
Remove door hardware
Removing the door hardware is the first step in refinishing your door. This usually involves removing door knobs, handles, hinges, and any other attachments.
- Identify the hardware: Determine what type of hardware is on your door.This might include handlesets, knobs, knockers, or peepholes.
- Unscrew visible screws: Most door hardware uses visible screws.Use a screwdriver (often a Phillips head) to remove these screws.
- Find hidden screws: Some hardware, like hinges, might have decorative covers concealing the screws. Use a flat-head screwdriver or a putty knife to gently pry these covers off.
- Address concealed screws:Certain door knobs use concealed screws or a detent holding them in place. For knobs with a small hole on the side, insert a small flat-head screwdriver or a straightened paperclip into the hole to release the knob. For knobs without a visible set screw,grasp the knob and rosette (the decorative plate around the knob) and pull them straight out from the door.
- Remove hinges: If taking the door off its hinges, tap a nail on the bottom of each hinge pin to push it upwards. Once the pin is loose, pull it out.
- Keep track of screws:Store screws and small parts in a safe place to avoid losing them. Consider using a labeled container or a magnetic tray.
Clean the door
A clean door is essential for a smooth finish.Dirt and grime can prevent the new finish from adhering properly.
- Use a hose,a bucket of soapy water, and a sponge to remove loose dirt, cobwebs, and debris.
- For stubborn grime, use a cleaner like trisodium phosphate (TSP).
- Allow the door to dry completely before moving on to the next step.
Sand the door
Sanding removes the old finish and creates a smooth surface for the new finish. This step is crucial for a professional-looking result.
- Use a random orbital sander with 80-grit sandpaper. Work your way up to 100-grit, then 120-grit.
- Sand with the grain of the wood to avoid scratches.
- Pay extra attention to flat surfaces like the door panels. I’ve found these areas often need more sanding to remove the old finish.
- After sanding, wipe down the door with a damp cloth to remove dust. Let the door dry completely before moving on to the next step.
The Refinishing Process
Choosing the right finish, whether it’s a durable varnish or a rich stain, is key. Apply that first coat with a brush, working it into the wood for a smooth, even look.
Choose a finish and apply first coat
The right finish protects your door and enhances its look. Apply the first coat after you prep the door.
- Choose a Finish: Select a finish that suits your needs and the door material.Enamel paint offers durability. Spar varnish, designed for exterior use, provides UV protection for wood.
- Prep the Finish: Stir the finish thoroughly. This ensures an even color and consistency.
- Start with a Brush: Use a high-quality China-bristle brush for smooth application.
- Apply the Finish:Apply the finish evenly to the door. Let it dry completely overnight.
Apply final coat and reattach hardware
Applying the final coat and reinstalling the door hardware is the last step in refinishing your front door.This step enhances the door’s appearance and protects the finish.
- Allow the stain to dry completely overnight.
- Lightly sand the door with 280-grit sandpaper to create a smooth surface for the final coat.
- Remove dust with a tack cloth.
- Apply the final coat of finish evenly to the door.
- Let the final coat dry completely.
- Reinstall the door hardware, including the doorknob, hinges, and any other removed items.
Remove excess gel stain
Excess gel stain can cause your finish to become sticky or uneven. After applying the gel stain, wipe away any excess using a clean, lint-free cloth. Work quickly and with the grain of the wood. This technique will help your Spanish style front doors achieve a smooth, rich finish, enhancing their warm, rustic appeal.
This process ensures a smooth and professional-looking finish.
Benefits of Professional Refinishing
A professionally refinished front door boosts curb appeal, extends its lifespan, and saves you time and effort on upkeep, read on to see how!
Improved appearance
A fresh coat of stain can dramatically improve your front door’s look. It enhances the wood’s natural beauty. This is especially noticeable with a high-performance, oil-based varnish.
The varnish highlights the wood’s rich color and grain. It creates a warm, welcoming entrance to your home. I’ve seen old, weathered doors transformed with just a bit of sanding and a new finish.
It’s amazing what a difference a little TLC can make.
Increased durability
A professionally refinished door resists weather damage better. Enamel paint provides a tough, durable finish. Spar varnish, ideal for exterior wood, offers UV protection. This protection prevents fading and cracking from the sun.
You’ll enjoy a door that looks great longer and requires less frequent refinishing.
Reduced maintenance
A fresh finish on your exterior door does more than make it look amazing. It’s a shield against the elements. Think of it like this: a good refinishing is like giving your door a suit of armor.
It helps the wood last longer, especially with those tough UV rays, rain, and snow. Clear finishes, like varnish, need a little extra TLC every few years. You’ll want to sand away the weathered top layer and add a new top coat.
This keeps your door looking sharp and protects your investment.
How to Refinish Your Front Door Without Removing It From Hinges
Want a fresh look without the hassle? You can refinish your entryway right on its hinges using a few simple tools like a screwdriver, sandpaper, and a paintbrush.
Materials needed
Professional refinishing enhances your door’s appearance and extends its lifespan.The right tools make all the difference in achieving a flawless finish.
- Sawhorses: These provide a stable and elevated work surface for refinishing your door comfortably.
- Random Orbit Sander: This power tool is essential for smoothing out imperfections and preparing the wood surface for stain or paint. Red Label Abrasives offers a range of sanding belts, sheets, and pads suitable for this task.
- Scrapers: Use these tools to remove any loose or flaking paint from your door before sanding and refinishing.
- Shop Vacuum: Maintaining a clean work area is crucial. Use a shop vacuum to remove dust and debris generated during the sanding process.
- Paintbrushes: Choose high-quality paintbrushes in various sizes for applying primer, stain, and a top coat to your door.
Steps to follow
Refinishing your front door can seem daunting, but it’s manageable with the right approach. Follow these steps for a successful refinishing project.
- Prep the door: Remove the door handle, hinges, and any other hardware. Clean the door with a damp cloth, removing dirt and debris. Use sandpaper and scrapers to remove old varnish and sun-baked wood flakes.
- Sand the surface: Use a random orbital sander with 80-grit sandpaper. Repeat with 100-grit and then 120-grit sandpaper for a smooth finish.
- Apply the first coat: Choose a finish like a stain or varnish. Apply it with a bristle brush. Start with the panels, then the moldings. Move to horizontal rails and finally vertical stiles. Allow it to dry overnight.
- Prepare for the second coat: Lightly sand the door with 220-grit sandpaper. Remove dust with a tack cloth.
- Apply the final coat: Apply the second coat of finish using the same method as the first. Let it dry overnight.
- Reattach hardware: Once the finish is completely dry, reattach the door handle, hinges, and other hardware.
Time-saving benefits
Leaving your front door in place during a refinishing project saves a significant amount of time. The typical refinishing process, including drying time, takes about three days. You can complete the project faster by skipping the steps of removing and rehanging the door.
This method also eliminates the need to handle heavy doors.
Conclusion
Refinishing your front door is an easy way to boost curb appeal, and your home’s value. A fresh finish protects your door from weather, too. Professionals deliver amazing results, but with a little elbow grease, you can handle this project.
Grab your sander, pick your stain, and give your front door a makeover it deserves.
FAQs
1. Is it necessary to remove the door from its hinges to refinish it?
Refinishing a door without removing it is possible, but professionals often prefer taking it down.This allows for easier access to all parts of the door, especially edges and top, and ensures a smooth, even finish.
2. Can I refinish an exterior door the easy way?
Absolutely! Start by removing all hardware like hinges, knobs, and knockers.Clean the door thoroughly to remove dirt and grime.Lightly sand the surface to create better adhesion for the new finish.Apply your chosen stain or paint evenly, allowing for proper drying time between coats.
3. What’s the best way to refinish a wood front door?
Begin by removing the old finish using a suitable stripper or sander.Sand the wood smooth, starting with coarser grit (like 120) and gradually moving to finer grit (220) for a flawless surface. Apply a wood conditioner before staining to ensure even absorption.Finally, protect your work with a durable exterior top coat.
4. How do I refinish my front door without removing it from the hinges?
If you choose to refinish the door in place, protect the surrounding area with drop cloths.Carefully remove the old finish, sand the surface, and apply the new stain or paint.Work in small sections to avoid drips and ensure even coverage.
5. What type of stain works best for refinishing a door?
Gel stains are a popular choice for doors due to their thicker consistency, which helps prevent drips and allows for better control during application.They also tend to provide richer, more even color than traditional oil-based stains.
6. My wood front door has seen better days. Any tips for giving it a refresh?
Consider using a wood filler to repair any cracks, holes, or imperfections before refinishing. Choose a high-quality exterior paint or stain specifically designed for doors to withstand the elements. Applying multiple thin coats will result in a more durable and attractive finish.Remember to allow ample drying time between coats.

Vanessa Calas, a 37-year-old writer and editor, boasts a remarkable 12-year career specializing in garden and home décor topics. Her passion for creative expression and design led her to graduate with honors from the Princeton University, Princeton in 2011, where she earned a Bachelor of Arts degree with a focus on the History of Art. Vanessa’s journey in the realm of writing began shortly after, as she immersed herself in the world of gardening and home aesthetics.
With a keen eye for detail and a deep understanding of art history, Vanessa has cultivated her writing skills to become a seasoned expert in the niche. Her ability to articulate the subtleties of design and capture the essence of outdoor and indoor spaces has made her a respected voice in the industry. As a testament to her dedication and proficiency, Vanessa currently serves as a senior editor at Home and the Around Blog.
Vanessa’s contributions to the field extend beyond her role as an editor; she is also recognized for her prowess as a writer. Her articles seamlessly blend informative content with a touch of creativity, making them not only educational but also engaging for readers. With an impressive track record and a passion for transforming spaces into aesthetic wonders, Vanessa Calas continues to leave an indelible mark in the world of garden and home décor writing.